
AWS Bastion Host Setup with NAT Gateway: Secure Private Subnet Access
AWS Bastion Host Setup with NAT Gateway: Secure Private Subnet Access
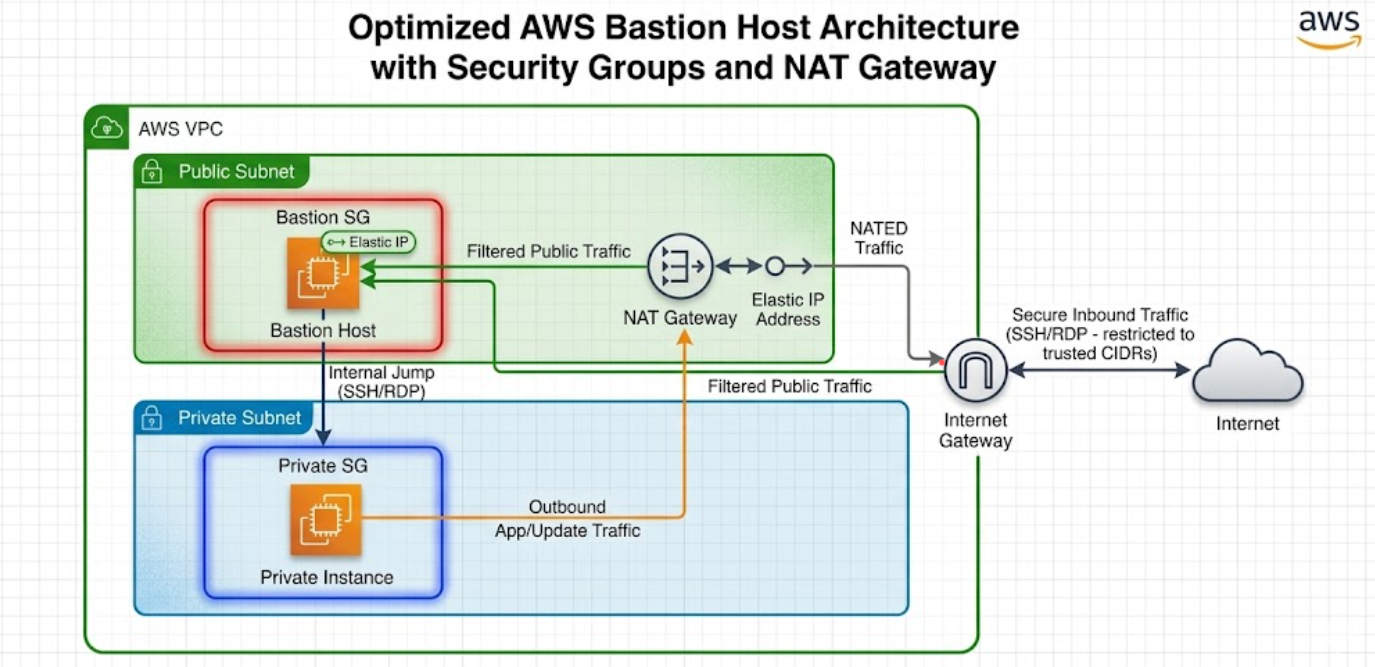
A bastion host (jump box) provides secure SSH access to instances in private subnets, while a NAT gateway allows those private instances to reach the internet for updates and patches — without exposing them to inbound traffic. This guide walks you through setting up both in an AWS sandbox environment.
Architecture Overview
                    Internet
                       |
                 [test-igw]
                       |
                  [test-vpc]
                 10.0.0.0/16
                /            \
   test-public-subnet-1a    test-private-subnet-1b
      10.0.1.0/24              10.0.2.0/24
           |                        |
   [test-bastion-ec2]       [test-private-ec2]
    (Public IP)              (No Public IP)
           |
   [test-nat-gw]
    (Elastic IP)
         ↓
   Private subnet routes
   outbound via NAT
The bastion host sits in the public subnet and acts as the single entry point to SSH into private instances. The NAT gateway (also in the public subnet) enables private instances to initiate outbound connections (e.g., yum update) while remaining unreachable from the internet.
Step 1: Create the VPC
- Go to VPC Console → Your VPCs → Create VPC
- Fill in:
- Name tag:
test-vpc - IPv4 CIDR block:
10.0.0.0/16 - Leave everything else as default
- Name tag:
- Click Create VPC
Step 2: Create Subnets
Public Subnet
- Go to VPC Console → Subnets → Create subnet
- Fill in:
- VPC: Select
test-vpc - Subnet name:
test-public-subnet-1a - Availability Zone: e.g.,
us-east-1a - IPv4 CIDR block:
10.0.1.0/24
- VPC: Select
- Click Create subnet
Private Subnet
- Click Create subnet again
- Fill in:
- VPC: Select
test-vpc - Subnet name:
test-private-subnet-1b - Availability Zone: e.g.,
us-east-1b - IPv4 CIDR block:
10.0.2.0/24
- VPC: Select
- Click Create subnet
Enable Auto-Assign Public IP for Public Subnet
- Select
test-public-subnet-1a - Click Actions → Edit subnet settings
- Check Enable auto-assign public IPv4 address
- Click Save
Step 3: Create and Attach Internet Gateway
- Go to VPC Console → Internet Gateways → Create internet gateway
- Name tag:
test-igw - Click Create internet gateway
- Click Actions → Attach to VPC → Select
test-vpc→ Attach
Step 4: Create NAT Gateway
The NAT gateway allows private subnet instances to access the internet for outbound traffic (software updates, API calls) without being directly reachable.
- Go to VPC Console → NAT Gateways → Create NAT gateway
- Fill in:
- Name:
test-nat-gw - Subnet: Select
test-public-subnet-1a(NAT gateway must be in a public subnet) - Connectivity type: Public
- Elastic IP allocation ID: Click Allocate Elastic IP (this assigns a static public IP to the NAT gateway)
- Name:
- Click Create NAT gateway
- Wait for the status to change to Available (takes 1–2 minutes)
Important: NAT gateways incur hourly charges and data processing fees. Remember to delete it during cleanup.
Step 5: Configure Route Tables
Public Route Table
- Go to VPC Console → Route Tables → Create route table
- Fill in:
- Name:
test-public-rt - VPC: Select
test-vpc
- Name:
- Click Create route table
- Select
test-public-rt→ Routes tab → Edit routes - Click Add route:
- Destination:
0.0.0.0/0 - Target: Select Internet Gateway →
test-igw
- Destination:
- Click Save changes
- Go to Subnet associations tab → Edit subnet associations
- Select
test-public-subnet-1a→ Click Save associations
Private Route Table (with NAT Gateway)
- Click Create route table
- Fill in:
- Name:
test-private-rt - VPC: Select
test-vpc
- Name:
- Click Create route table
- Select
test-private-rt→ Routes tab → Edit routes - Click Add route:
- Destination:
0.0.0.0/0 - Target: Select NAT Gateway →
test-nat-gw
- Destination:
- Click Save changes
- Go to Subnet associations tab → Edit subnet associations
- Select
test-private-subnet-1b→ Click Save associations
Key difference from a setup without NAT: The private route table now routes
0.0.0.0/0through the NAT gateway, giving private instances outbound internet access.
Step 6: Create Security Groups
Bastion Security Group
- Go to VPC Console → Security Groups → Create security group
- Fill in:
- Name:
test-bastion-sg - Description:
Allow SSH to bastion - VPC: Select
test-vpc
- Name:
- Inbound rules → Add rule:
- Type: SSH
- Source:
My IP(or0.0.0.0/0for testing only)
- Click Create security group
Private Instance Security Group
- Click Create security group
- Fill in:
- Name:
test-private-sg - Description:
Allow SSH from bastion only - VPC: Select
test-vpc
- Name:
- Inbound rules → Add rule:
- Type: SSH
- Source: Select Custom → type
test-bastion-sgand select it
- Click Create security group
Step 7: Create a Key Pair
- Go to EC2 Console → Key Pairs → Create key pair
- Fill in:
- Name:
test-keypair - Type: RSA
- Format:
.pem
- Name:
- Click Create key pair — the
.pemfile downloads automatically - Set permissions on your local machine:
chmod 400 test-keypair.pem
Step 8: Launch EC2 Instances
Bastion Host (Public Subnet)
- Go to EC2 Console → Instances → Launch instances
- Fill in:
- Name:
test-bastion-ec2 - AMI: Amazon Linux 2023 (free tier eligible)
- Instance type:
t2.micro - Key pair:
test-keypair
- Name:
- Under Network settings, click Edit:
- VPC:
test-vpc - Subnet:
test-public-subnet-1a - Auto-assign public IP: Enable
- Security group: Select existing →
test-bastion-sg
- VPC:
- Click Launch instance
Private Instance
- Click Launch instances again
- Fill in:
- Name:
test-private-ec2 - AMI: Amazon Linux 2023
- Instance type:
t2.micro - Key pair:
test-keypair
- Name:
- Under Network settings, click Edit:
- VPC:
test-vpc - Subnet:
test-private-subnet-1b - Auto-assign public IP: Disable
- Security group: Select existing →
test-private-sg
- VPC:
- Click Launch instance
Step 9: Connect via Bastion Host
Option A: SSH Agent Forwarding (Recommended)
# Add key to SSH agent
eval "$(ssh-agent -s)"
ssh-add test-keypair.pem

# SSH into bastion with agent forwarding
ssh -A ec2-user@<BASTION_PUBLIC_IP>

# From bastion, SSH into private instance
ssh ec2-user@<PRIVATE_INSTANCE_PRIVATE_IP>
Option B: Copy Key to Bastion (Less Secure)
# Copy key to bastion
scp -i test-keypair.pem test-keypair.pem ec2-user@<BASTION_PUBLIC_IP>:~/

# SSH into bastion
ssh -i test-keypair.pem ec2-user@<BASTION_PUBLIC_IP>

# From bastion, SSH into private instance
chmod 400 test-keypair.pem
ssh -i test-keypair.pem ec2-user@<PRIVATE_INSTANCE_PRIVATE_IP>
Replace
<BASTION_PUBLIC_IP>and<PRIVATE_INSTANCE_PRIVATE_IP>with actual IPs from the EC2 console.
Step 10: Verify NAT Gateway Connectivity
Once connected to the private instance (via bastion), verify outbound internet access:
# Test internet connectivity
ping -c 3 google.com

# Update packages (confirms NAT is working)
sudo yum update -y

# Check the public IP seen by external services
curl http://checkip.amazonaws.com
The returned IP should be the Elastic IP of the NAT gateway, not the bastion's IP. This confirms traffic from the private instance routes through the NAT gateway.
How NAT Gateway Works
| Traffic Direction | Path |
|---|---|
| Inbound to private instance | Blocked — no public IP, no inbound route |
| Outbound from private instance | Private EC2 → NAT Gateway (public subnet) → Internet Gateway → Internet |
| SSH to private instance | Your machine → Bastion (public subnet) → Private EC2 |
The NAT gateway performs network address translation: it replaces the private instance's source IP with its own Elastic IP for outbound traffic, and routes responses back to the originating instance.
Quick Verification Checklist
- VPC
test-vpccreated with CIDR10.0.0.0/16 - Public subnet
test-public-subnet-1awith auto-assign public IP enabled - Private subnet
test-private-subnet-1b - Internet gateway
test-igwattached totest-vpc - NAT gateway
test-nat-gwin public subnet with Elastic IP - Public route table
test-public-rthas route0.0.0.0/0 → test-igw - Private route table
test-private-rthas route0.0.0.0/0 → test-nat-gw - Bastion SG allows SSH from your IP
- Private SG allows SSH from bastion SG only
- Bastion EC2 has a public IP and is reachable via SSH
- Private EC2 is reachable only through the bastion
- Private EC2 can reach the internet (ping, yum update)
Cleanup (When Done)
Delete resources in this order to avoid dependency errors:
- Terminate both EC2 instances (
test-bastion-ec2,test-private-ec2) - Delete NAT gateway
test-nat-gw(wait for it to be deleted) - Release the Elastic IP associated with the NAT gateway
- Delete security groups (
test-bastion-sg,test-private-sg) - Delete subnets (
test-public-subnet-1a,test-private-subnet-1b) - Detach and delete internet gateway
test-igw - Delete route tables (
test-public-rt,test-private-rt) - Delete VPC
test-vpc - Delete key pair
test-keypair
Cost reminder: NAT gateways charge ~$0.045/hour + $0.045/GB processed. Always delete when not in use.
Common Troubleshooting
| Issue | Solution |
|---|---|
| Private instance can't reach internet | Check private route table has 0.0.0.0/0 → NAT gateway route |
| NAT gateway stuck in "Pending" | Ensure it's in a public subnet with an internet gateway route |
| SSH timeout to bastion | Verify bastion SG allows SSH from your current IP |
| SSH timeout from bastion to private | Verify private SG allows SSH from test-bastion-sg |
curl works but ping doesn't from private instance |
NAT gateway doesn't support ICMP ping to all destinations; use curl to verify |